
The upload consent (link to how to create nUpload consent) is a way of gathering consent beforehand and is great to use for events, employees or your board members.
Upload consent can by applied through tagging of each image (link to how to tag images with consent) and when you select a consent person or you can apply an upload consent to multiple assets at the same time.
Follow these steps to apply upload consent to multiple assets:
Upload consent can by applied through tagging of each image (link to how to tag images with consent) and when you select a consent person or you can apply an upload consent to multiple assets at the same time.
Follow these steps to apply upload consent to multiple assets:
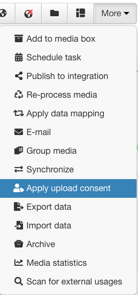
- Search for the assets in question - you can use the filters to find the assets,
eg. uploaded by - x
uploaded date - after - x - When you have found the assets you want to attach upload consent, mark them and in the menu, choose the more button.
- A prompt appears that shows the images you selected and gives you an opportunity to search for the persons appearing in the images.
.png?width=688&height=410&name=upload_consent(2).png)
NOTE: Any persons found tagged in the selected media will already be suggested automatically.
- When searching for a person, you can add that one and their upload consent are listed, select the one in question.
You can add several persons at the same time from the prompt..png?width=688&height=276&name=Upload_consent(3).png)
- If a person you add don't have an upload consent attached you will get a message - No upload consent. If that is the case, create a new upload consent for them or request separately through the request consent function.
.png?width=688&height=122&name=Upload_consent(4).png)
- When you have added all needed consent persons and selected the upload consent to use, you press Apply.
NOTE: You don't need to tag each person in the pictures to apply consent, it is ok to only apply the consent on the images in question.