How to manage clipping paths on your assets
Clipping paths are great to use when managing product images or other types of assets where you would like to work with transparent backgrounds.
Within QBank, users have the capability to view and manage clipping paths associated with assets. If an asset contains multiple clipping paths, you can easily designate one as the primary clipping path. Below is a guide on how to manage clipping paths in both the detailed view and the list view.
Viewing clipping paths in the detailed view
To view and manage clipping paths in the detailed view of an asset, follow these steps:
-
Open the detailed view:
- Double-click on an asset to access its detailed view.
-
Locate clipping path information:
- Scroll down to the information section beneath the asset preview. If the asset has clipping paths, this section will indicate how many clipping paths are associated with the asset.
-
View available clipping paths:
- Click on the clipping path section to see all the available clipping paths associated with the asset. If a primary clipping path is selected it is highlighted with a blue frame.

- Click on the clipping path section to see all the available clipping paths associated with the asset. If a primary clipping path is selected it is highlighted with a blue frame.
-
Set a primary clipping path:
- Hover over the clipping paths, and a button to select the primary path will appear. Click on "Mark as primary" next to the desired clipping path to designate it as the primary one, which will be used by default.

- Hover over the clipping paths, and a button to select the primary path will appear. Click on "Mark as primary" next to the desired clipping path to designate it as the primary one, which will be used by default.
Managing clipping paths in the list view
If you have multiple assets to work with, utilizing the list view can simplify the process.
-
Filter assets:
- Apply any necessary filters to narrow down the selection of assets you want to manage.
-
Switch to list view:
- Select the list view to display your filtered assets in a list format.
-
Display clipping path column:
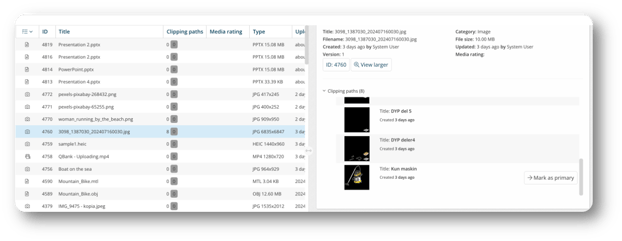
- If the clipping paths column is not visible, you can add it from the column selection menu in the top left corner. This will allow you to see how many clipping paths each asset has. If you roll over the number of clipping paths you will get an pop up showing all clipping paths.


NOTE:
Explanation of the numbers displayed in the clipping path column:
The first number indicates the total number of clipping paths associated with an asset, while the second number shows which of these paths are marked as the primary. If the number is 0, it means the asset either has no clipping paths or none of the clipping paths are designated as primary.
- If the clipping paths column is not visible, you can add it from the column selection menu in the top left corner. This will allow you to see how many clipping paths each asset has. If you roll over the number of clipping paths you will get an pop up showing all clipping paths.
- Manage clipping paths in preview mode:
Click on the preview mode icon to open a split view where you can manage clipping paths directly. The clipping paths for each asset will be displayed on the right side, allowing you to easily select a primary clipping path. If primary clipping path is selected it is highlighted with a blue frame.

Conclusion
Using these steps, you can efficiently manage and designate primary clipping paths for your assets, ensuring they are ready for distribution across different channels.
