
Configuring Connector V2.1: Key steps to get started
When setting up Connector V2.1, there are several important steps to ensure a smooth configuration:
- Assigning access – Making the connector available to the right user groups
- Connector setup – Configuring the connector in your admin settings
- Defining asset availability – Specifying which assets (targets) should be accessible to each team and connector
Currently, V2.1 connectors are available for:
- Office 365 Connector – Providing seamless access to assets within Office applications
- Browser Connector – Enabling quick access to assets for web-based workflows
You can have one or both connectors included in your QBank package. The QBank team will help you get started, but for further optimization, the following steps are important to know. This guide will walk you through configuring them effectively, whether you are setting up a single connector or managing multiple.
This article includes 4 sections:
- Setting up necessary access on users and groups
- Configuring the Browser connector
- Configuring the Office 365 connector
- Setting up and configuring Target of assets
Making the Connector available for use
To access and configure Connector V2.1, it must be assigned to the right user groups for both setup and use.
Accessing Connector Settings
To configure the connector, users need the right admin permissions:
- The Connector V2.1 settings must be assigned to a user group that handles configuration.
- A Connector Admin role must be added for administrators. This role allows access to the connector settings through the Admin group.
Giving Users Access to the Connector
For users to use the connector, they must be part of a group with the right permissions:
- For example, the Office 365 Connector can be added to the Editor role so editors can access it.
- If your QBank setup has more specific user roles, you can control exactly who should have access to each connector.
This setup ensures that the right people can configure and use the connector while keeping everything organized and secure.
The QBank team will assist you in setting up user groups correctly. If you need more specific groups with access to certain content, they can help you configure the settings to match your needs.
Getting started with the configuration
The connector configurations are accessible through your QBank administration page. In the left menu, navigate to Settings and then select Connector V2.1 to manage and customize your connector settings.
Your available connectors will be listed here, and you can make necessary configuration connected to the connector and the targets.

Configuring the Browser connector
When configuring the Browser Connector, there are two key settings to consider:
- Connector Behavior – Defining how the connector should function for your users.
- Available Targets – Selecting what targets or content should be accessible through the connector.
These settings allow you to control both how users interact with the connector and what content they can access.

When configuring the Browser connector you have following options:
- Title: Not in use today, can later be used out in the connector to display a unique title for the connector.
-
Source ID: Used for behaviour tracking and usage statistics. Add the Source ID to track how assets are accessed, visible in the asset detail view.
-
Show folder: Will show folders the user have access to in the connector. (not implemented yet)
-
Show moodboards: Will show moodboards the user have access to in the connector. (not implemented yet)
-
Accept uploads to the QBank: Will make it possible to upload assets through the connector. The Max file size and Chunk size determine how big a file can be to be able to upload from the connector and also how how a bigger file will be chunked. (not implemented yet)
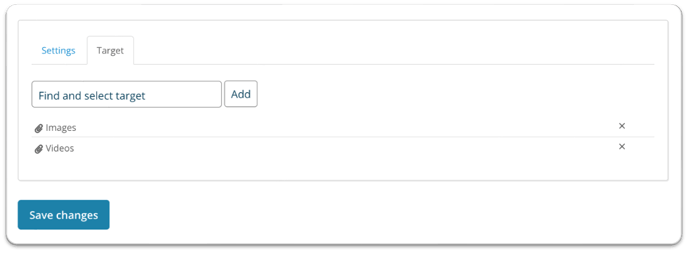
Under Targets, you can select which of the pre-configured targets should be available in this connector. All created targets will appear in the dropdown menu for selection.
NOTE: Access to specific targets is determined during their setup, allowing you to control which user groups can access each one.
Configuring the Office 365 connector
When configuring the Office 365 Connector, there are two key settings to consider:
- Connector behavior – Defining how the connector should function for your users.
- Available targets – Selecting what targets or content should be accessible through the connector.
These settings allow you to control both how users interact with the connector and what content they can access.

When configuring the Office 365 connector you have following options:
- Title: Not in use today, can later be used out in the connector to display a unique title for the connector.
- Source ID: Used for behaviour tracking and usage statistics. Add the Source ID to track how assets are accessed, visible in the asset detail view.
- Show folder: Will show folders the user have access to in the connector. (not implemented yet)
- Show moodboards: Will show moodboards the user have access to in the connector. (not implemented yet)
- Accept uploads to the QBank: Will make it possible to upload assets through the connector. The Max file size and Chunk size determine how big a file can be to be able to upload from the connector and also how how a bigger file will be chunked. (not implemented yet)
- Save as new version / new version: Will make it possible to save a Powerpoint or Word document to QBank. If the document already exist in QBank the option New version will be available.
Under Targets, you can select which of the pre-configured targets should be available in this connector. All created targets will appear in the dropdown menu for selection.
NOTE: Access to specific targets is determined during their setup, allowing you to control which user groups can access each one.
How to set up a new Target
Targets are shortcuts that help users quickly find specific assets. They can be linked to a specific folder or assets that match a specific filter. A Target can be assigned to one or multiple connectors, allowing for flexible access across.
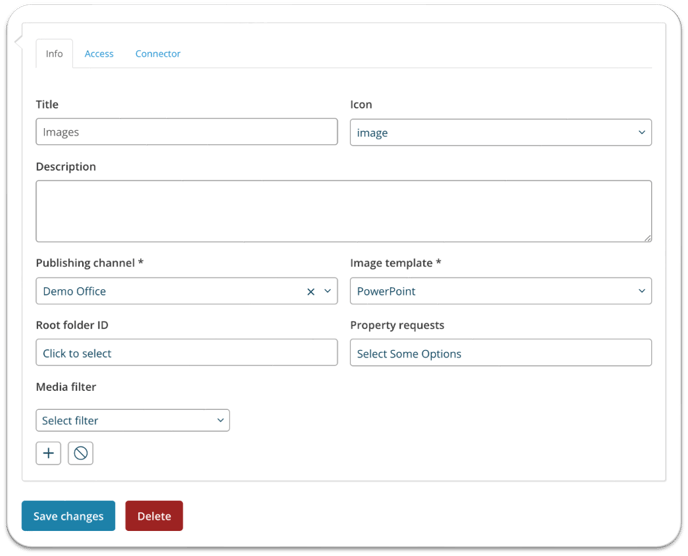
How to add a new target:
- Click "Add New " above targets.
- Enter a Title for the target.
- Choose an Icon to represent the target.
- (Optional) Add a Description – This is not mandatory and is not currently displayed in the connectors.
- Select a Publishing Site for the target.
- Set a Default Template for images displayed in the connector.
- (Optional) Select a Folder if you want to display images from a specific location.
- (Optional) Add Filterable Properties if you want users to filter assets within the connector.
- (Optional) Apply a Filter to show only assets that meet specific criteria.
- When done, click Save Changes
This setup ensures that the target is configured correctly and optimized for use within the connector.
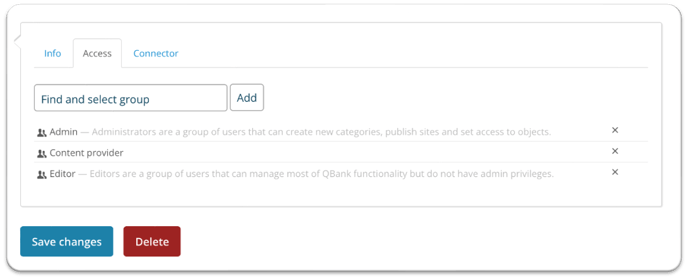
Configure who should have access to the specific target:
1. Search for the groups that should have access to this specific Target.
2. Click Add, and Save changes
NOTE: Ensure that the required connector user role is assigned to the appropriate groups to grant access within the connector.

Configure in what connector the target should be available:
1. Search for the connector where this specific target should be used.
2. Click Add, and Save changes
By setting up access for different groups and creating relevant targets with the right group assignments, you ensure that users can easily access the right assets in the right channels for their work.
If you need guidance on structuring your connector setup, our support team is happy to help. Feel free to reach out for assistance in creating an efficient and well-organized configuration.